PHOTOCOPIER TROUBLESHOOTING GUIDE FOR OFFICE ADMIN
Quick Fix for Offices: Easy Waste Toner Tank Replacement in Photocopiers
Quick Fix for Offices: Easy Waste Toner Tank Replacement in Photocopiers
Nothing slows down office productivity like an error message saying, "Waste Toner Tank Full." While the best solution is to replace the waste toner tank immediately, sometimes replacements aren’t immediately available. As someone who has dealt with multiple photocopier brands, I’ve learned a few temporary fixes to keep operations running smoothly until a new tank arrives. I’ll also share step-by-step guides for replacing waste toner tanks in Fujifilm, Ricoh, Sharp, and HP photocopiers—because every office needs a hassle-free backup plan.
Temporary Solutions When the Waste Toner Tank is Full
If you’re stuck with a full waste toner tank and need a quick workaround, consider these temporary measures (use with caution!):
-
Manual Emptying (Not Recommended Long-Term)
- For emergency cases, you can carefully remove the waste toner tank and gently empty its contents into a sealed bag.
- WARNING: Toner is messy and can be harmful if inhaled. Wear gloves and a mask.
-
Reset the Waste Toner Counter (If Supported)
- Some models allow a temporary override by resetting the waste toner counter in the service or maintenance mode.
- Check the user manual—this is not a permanent fix but can buy time.
-
Use a Compatible Temporary Container
- If you can’t replace the tank immediately, a clean, sealed plastic bottle can act as a makeshift container.
- Ensure it’s secured tightly to prevent leaks.
-
Reduce Toner Waste
- Lower print quality settings (e.g., draft mode) to slow the filling of the waste toner tank.
Now, let’s move on to the proper way to replace waste toner tanks for different brands.
Step-by-Step Waste Toner Tank Replacement Guide
1. Fujifilm Photocopiers
Steps:
- Power off the machine and unplug it.
- Open the front cover and locate the waste toner tank (usually near the toner cartridge).
- Remove the locking clip (if present) and gently pull out the tank.
- Insert the new tank, ensuring it clicks into place.
- Close the cover, power on, and reset the counter via maintenance mode if needed.
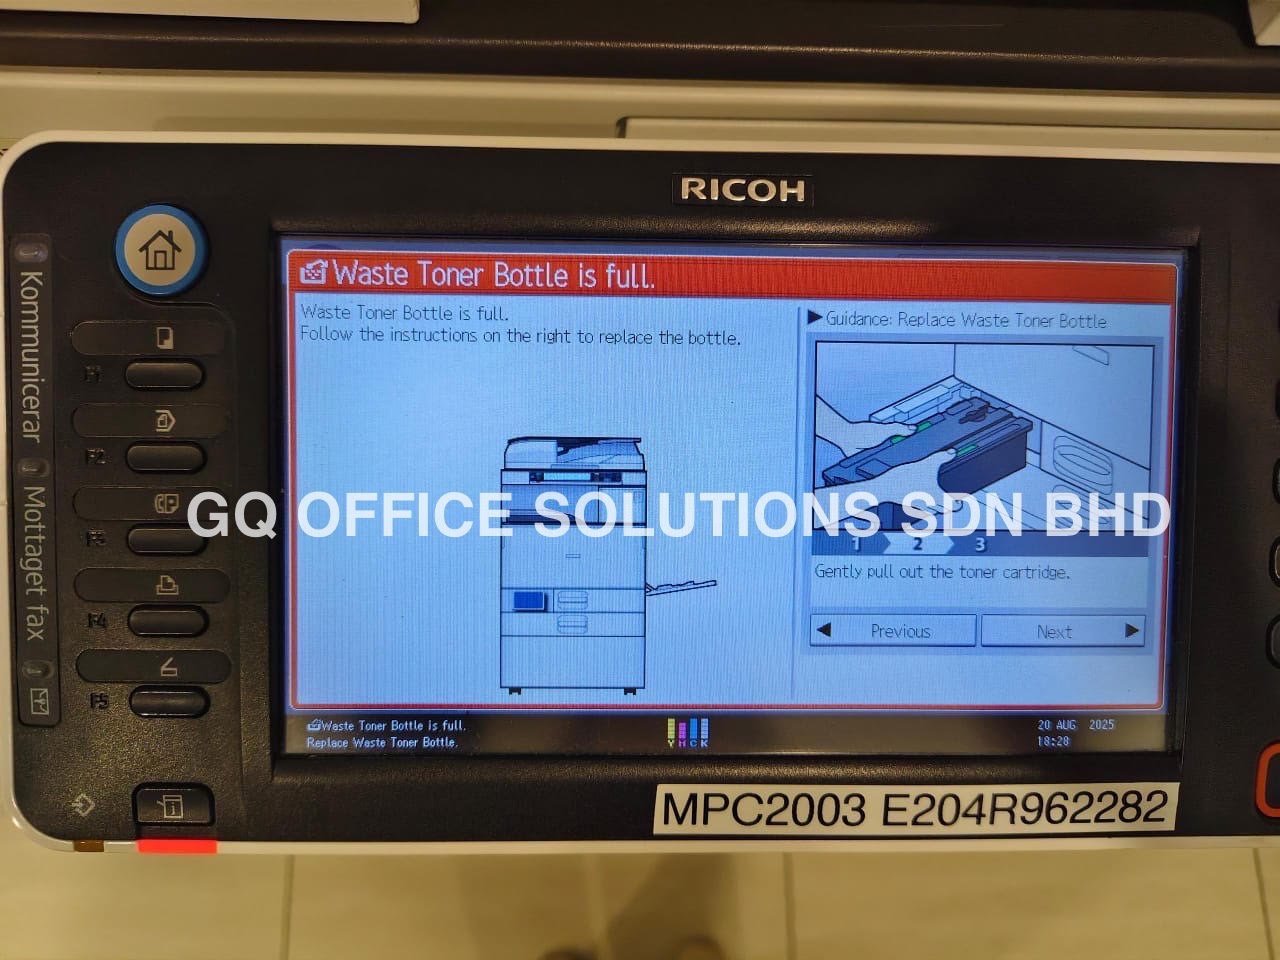
2. Ricoh Photocopiers
Steps:
- Turn off the copier and wait for it to cool down.
- Open the side or front panel to access the waste toner bottle.
- Twist or slide the bottle out gently to avoid spills.
- Insert the new bottle, aligning the grooves properly.
- Close the panel, turn on the machine, and check for errors.
3. Sharp Photocopiers
Steps:
- Power off the device and unplug it for safety.
- Open the maintenance door (usually at the front or side).
- Locate the waste toner box and lift the release lever.
- Pull the tank straight out and replace it with a new one.
- Secure the lever, close the door, and restart the machine.
4. HP Laser Printers & Copiers
Steps:
- Turn off the printer and disconnect the power cable.
- Open the rear access cover (some models may have a side panel).
- Remove the waste toner container by pressing the release tab.
- Insert the new container, ensuring it locks in place.
- Close the cover, reconnect power, and run a test print.
Watch the video below for an easy, step-by-step tutorial on replacing your photocopier’s waste toner tank like a pro.
Brand-Specific Waste Toner Tank Replacement Table
| Brand | Location of Waste Toner Tank | Key Steps |
|---|---|---|
| Fujifilm | Near toner cartridge, front panel | Unlock clip, slide out, replace, reset counter |
| Ricoh | Side or front panel | Twist/slide out, align new bottle grooves |
| Sharp | Maintenance door, front or side | Lift lever, remove box, insert new one |
| HP | Rear or side panel | Press release tab, swap container |
FAQ – Waste Toner Tank Questions Answered
Q: Can I reuse the waste toner tank after emptying it?
A: No, waste toner tanks are designed for one-time use due to contamination risks. Always replace it.
Q: Is waste toner hazardous?
A: Yes, toner particles can be harmful if inhaled. Always wear gloves and a mask when handling.
Q: How often should I replace the waste toner tank?
A: It depends on usage, but most copiers notify you when it’s 80-90% full. Check monthly in high-volume offices.
Q: Can ignoring a full waste toner tank damage my copier?
A: Yes! Overflows can clog internal mechanisms, leading to costly repairs. Replace it as soon as possible.
Q: Does all toner go into the waste tank?
A: No, only excess and residual toner from cleaning cycles goes into the waste tank.
Final Thoughts
A full waste toner tank is an inconvenience, but emergency workarounds and proper replacement steps keep your office running smoothly. Whether you manage Fujifilm, Ricoh, Sharp, or HP devices, knowing how to replace the waste toner tank quickly reduces downtime.
For a long-term solution, always keep a spare waste toner tank in stock—because prevention is easier than last-minute fixes!
Photocopier Bypass Tray Printing: Envelopes, Labels & Thick Paper
Bypass Tray Functions Explained: The Secret to Printing Labels, Envelopes, and Thick Paper
In any busy office, we've all faced the same challenge. You need to print a single, crucial envelope, a batch of glossy labels, or a certificate on heavy cardstock. The thought of emptying the main paper tray, fumbling with the settings, and hoping for the best is enough to cause a headache. Fortunately, there's a feature on almost every office photocopier designed specifically for these tasks: the bypass tray.
Often overlooked, the bypass tray is one of the most versatile tools at our disposal. Mastering its use can save time, prevent frustrating paper jams, and elevate the quality of our printed materials. In this guide, we'll explain the function of the photocopier bypass tray and compare how to use it on four of the most popular office brands: Ricoh, Fujifilm, Sharp, and HP.
What is a Bypass Tray and Why is it Essential?
So, what exactly is the bypass tray? Think of it as the express lane for your printer. It's a manual-feed tray, usually located on the side of the machine, that allows you to introduce media directly into the copier's printing path.
The primary function of the photocopier bypass tray is to provide a shorter, straighter path for the paper to travel. Unlike the main paper cassettes, which require paper to be pulled up and around multiple rollers, the bypass tray feeds media almost directly through to the fuser and out of the machine. This straight path is critical for several reasons:
- Prevents Jamming: Thick paper, cardstock, and rigid media are less likely to get stuck or creased.
- Protects Special Media: It's ideal for envelopes with windows or labels on a sheet, as the gentler path reduces the risk of them peeling off inside the machine.
- Accommodates Odd Sizes: It easily handles non-standard paper sizes that won't fit in the main trays.
- Offers Convenience: It allows for quick, one-off print jobs on different paper without having to reconfigure an entire cassette.
How to Use the Bypass Tray: A Brand-by-Brand Guide
While the principle is the same across manufacturers, the exact steps and, most importantly, the way you load the paper can differ. Getting this wrong is the number one cause of printing errors.
A Crucial Note on Paper Orientation: The most critical detail is whether to load paper face-up or face-down. This refers to the side you want to be printed on.
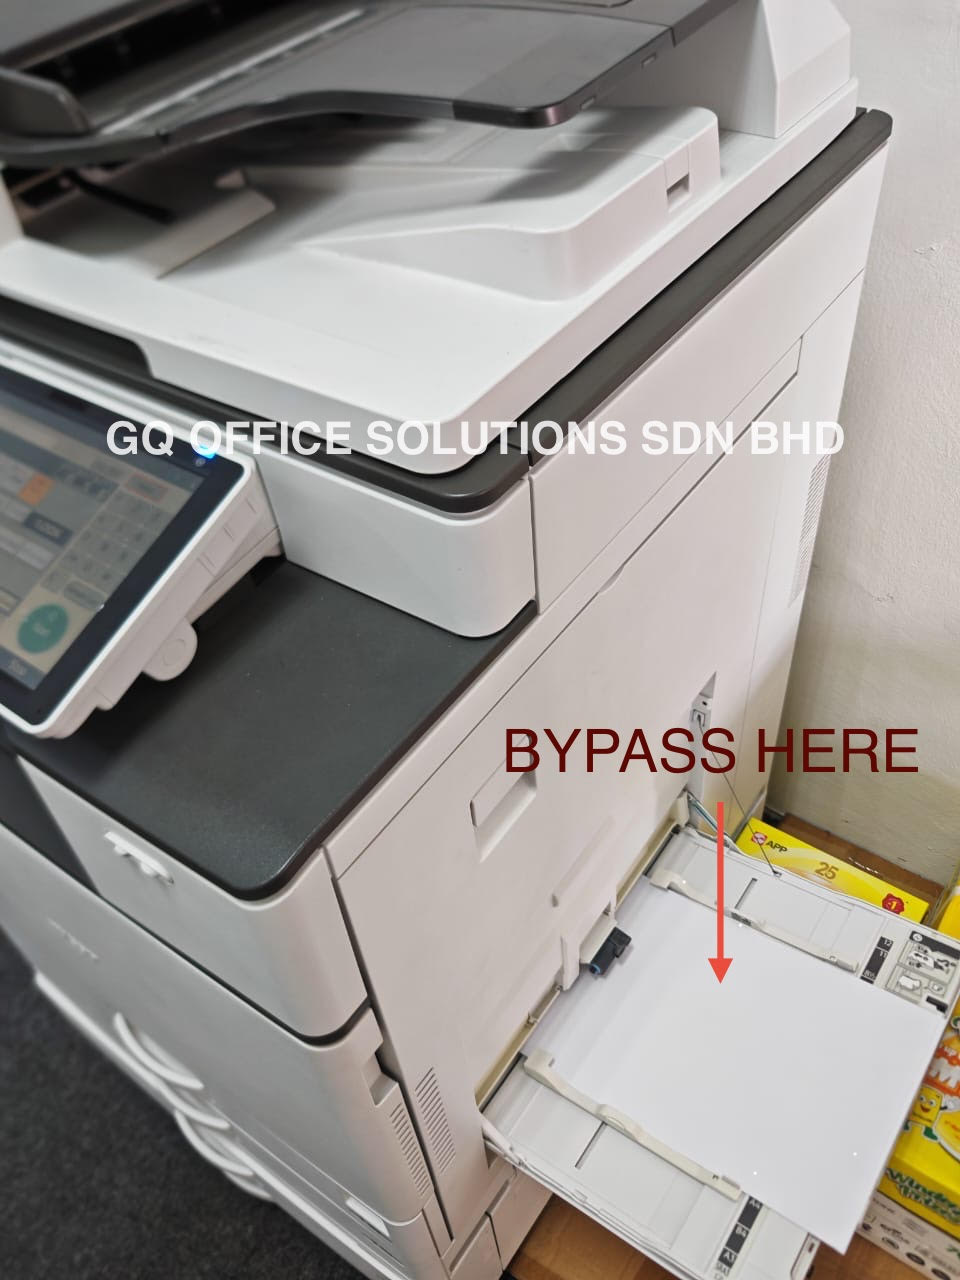
Brand Ricoh Photocopier
Ricoh copiers are known for their reliability, and their bypass trays are straightforward.
- Locate and Open: The bypass tray is typically a folded-up panel on the right side of the machine. Pull it down gently and extend the paper support flap if necessary.
- Load the Paper (Face-Down): For Ricoh models, you almost always load the media with the print side facing down. If you're printing an envelope, the side with the address should be facing down, with the flap closed and pointing towards the machine.
- Adjust the Guides: Slide the blue or green paper guides until they are snug against the edges of your media. Don't make them too tight, as this can cause buckling.
- Confirm on Screen: The copier's touch screen will automatically prompt you to specify the paper settings. This is a vital step. Select the correct size (e.g., A4, Envelope COM10) and, more importantly, the type (e.g., Thick Paper, Labels, Envelope). This tells the fuser to adjust its temperature and speed to bond the toner correctly.
Brand Fujifilm (formerly Fuji Xerox) Photocopier
Fujifilm machines follow a very similar logic to Ricoh.
- Locate and Open: Find the bypass tray on the side of the device, pull it open, and extend the support.
- Load the Paper (Face-Down): Like Ricoh, Fujifilm requires you to place the media with the side to be printed on facing down.
- Adjust the Guides: Use the sliding guides to secure the paper stack in the center of the tray.
- Confirm on Screen: A menu will appear on the control panel. Confirm or change the paper size and type to match what you have loaded. If you skip this, you risk smudged prints or jams.
Brand Sharp Photocopier
Sharp photocopiers are user-friendly, and their bypass trays are no exception.
- Locate and Open: The bypass tray is on the side, often marked with an icon. Open it and pull out any extensions.
- Load the Paper (Face-Down): Consistent with its Japanese counterparts, Sharp copiers require the media to be loaded face-down. The print side should face the floor.
- Adjust the Guides: Carefully align the guides to the edges of your paper or envelopes.
- Confirm on Screen: The machine will ask you to verify the media. Use the touch screen to select the size and type from the menu. Choosing "Heavy Paper" or "Envelope" is essential for a quality result.
Brand HP Photocopier
HP often does things a little differently, and the bypass tray (often called Tray 1) is a key example.
- Locate and Open: On most HP LaserJet MFPs, the bypass tray, or Tray 1, is a fold-down door on the front or left side of the machine.
- Load the Paper (Face-Up): This is the most significant difference. For the majority of HP models, you load the media with the print side facing up. For envelopes, this means the address side is up, with the top edge feeding into the machine first.
- Adjust the Guides: Squeeze and slide the guides to fit the media width.
- Confirm on Screen: HP printers are very good at detecting the paper size automatically, but a prompt will still appear on the screen or your computer's print driver. Always verify that the paper type (e.g., Cardstock, Labels) is correctly selected.
Quick Comparison Table
| Brand | Typical Tray Location | Paper Loading Orientation | Key On-Screen Step |
|---|---|---|---|
| Ricoh | Right Side | Face-Down | Manually set Size & Type on the control panel. |
| Fujifilm | Right Side | Face-Down | Manually confirm Size & Type when prompted. |
| Sharp | Right Side | Face-Down | Select paper Size & Type from the on-screen menu. |
| HP | Front or Left Side | Face-Up | Verify the auto-detected Size & select Type. |
Watch the video below for a step-by-step guide on using your copier’s bypass tray effectively and efficiently.
Frequently Asked Questions (FAQs)
Q1: My labels peeled off inside the machine and caused a huge jam. What went wrong? This is a classic symptom of not selecting the correct paper type. When you load labels but leave the setting as "Plain Paper," the fuser unit gets too hot, melting the adhesive and causing the labels to peel off the backing sheet. Always select "Labels" on the control panel to ensure the machine uses a lower temperature.(To ensure reliable performance, use only high-grade label or sticker paper that's heat-resistant and designed for bypass tray use).
Q2: Can I load a full ream of paper into the bypass tray? No. The bypass tray is designed for small, special jobs and has a much lower capacity than the main cassettes, typically holding between 50 to 100 sheets, depending on the model and paper thickness. Overloading it will lead to feeding issues.
Q3: The copier isn't detecting the paper in the bypass tray. What should I do? First, ensure the paper is pushed in far enough to engage the sensor. Second, check that the paper guides are snug against the paper—if they are too wide, the machine may not register the size correctly. Finally, make sure you have acknowledged the prompt on the control panel screen.
By understanding and utilizing the bypass tray correctly, we can unlock the full potential of our office equipment, turning daunting print tasks into simple, routine jobs.
Looking for copier bypass tray for printing labels, envelopes, and thick paper on Ricoh, Fujifilm, Sharp, and HP devices—without paper jams. CONTACT US NOW!!!
How to Change a Photocopier Toner Cartridge Safely and Correctly
How to Replace Photocopier Toner Cartridge: Step-by-Step Guide for Any Photocopier
When it comes to maintaining our office's productivity, a well-functioning photocopier is crucial. A common issue we face is running out of toner. Understanding how to change the photocopier toner cartridge is an essential skill for any office professional. In this article, we’re going to guide you through the steps to replace toner cartridges for popular brands such as Ricoh, Sharp, Fuji Xerox, and HP.
Why Replace Photocopier Toner on Time?
Replacing the toner cartridge promptly can prevent print quality issues, saving us both time and money. Running prints with low toner levels can lead to streaky, faded documents that are unacceptable in most professional settings. By learning how to change toner cartridges efficiently, we can ensure our photocopier remains in excellent working condition.
Tools Needed
Before we begin, let’s ensure we have everything we need on hand:
- New toner cartridge
- Clean, lint-free cloth
- Gloves (optional)
Now, let’s dive into the steps for changing toner cartridges for various brands.
| Brand | Step 1 | Step 2 | Step 3 | Step 4 | Step 5 |
|---|---|---|---|---|---|
| Ricoh | Open the front cover of the copier. | Locate the toner cartridge. | Remove the old cartridge. | Shake the new cartridge gently. | Insert new cartridge, close cover. |
| Sharp | Press the “Toner” button. | Lift the toner compartment cover. | Take out the empty cartridge. | Prepare the new cartridge. | Place new cartridge, snap cover shut. |
| Fuji Xerox | Open the front door. | Identify the cartridge to replace. | Pull out the cartridge. | Gently rock the new cartridge. | Install it, then close the front door. |
| HP | Open the printer access door. | Find the toner cartridge. | Slide out the old cartridge. | Unbox the new cartridge carefully. | Insert new cartridge, close door. |
Detailed Instructions
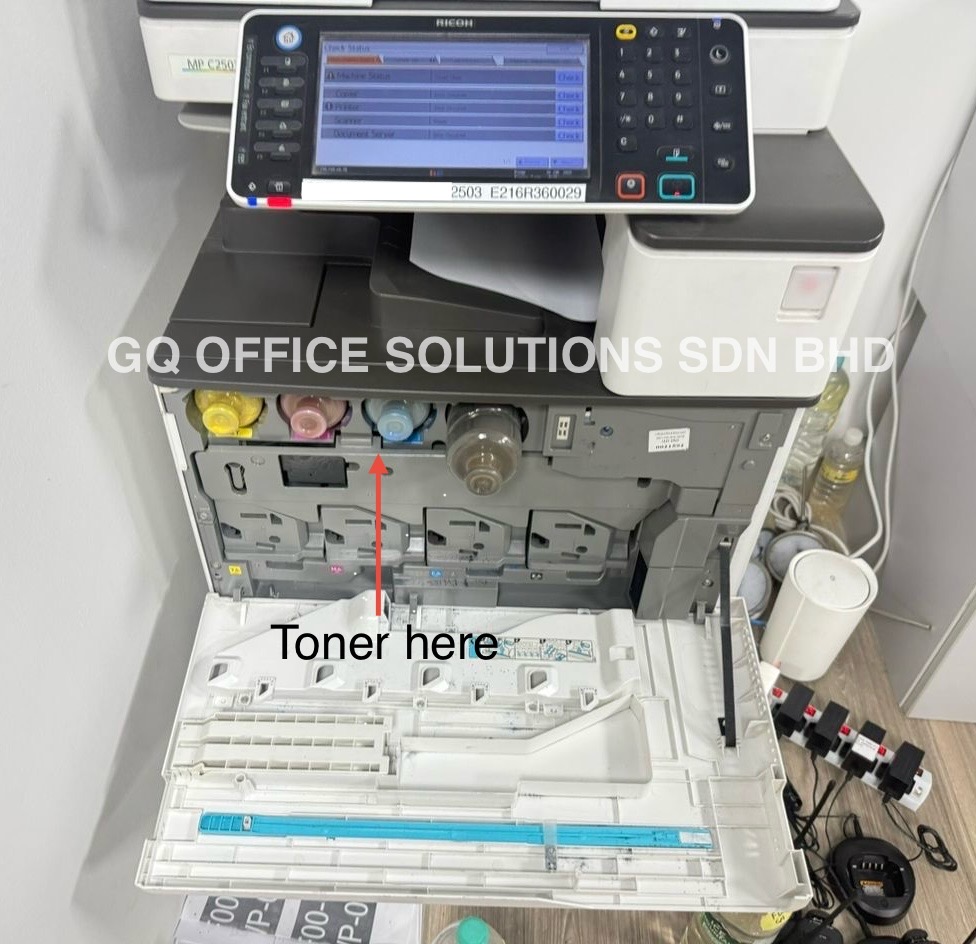
Changing Toner for Ricoh Photocopiers
- Open the Front Cover: Start by opening the front cover of the photocopier.
- Locate the Toner Cartridge: You will find the toner cartridge situated in a designated slot.
- Remove the Old Cartridge: Carefully pull the old toner cartridge out by lifting it straight up.
- Prepare the New Cartridge: Before inserting the new cartridge, gently shake it back and forth. This ensures the toner is distributed evenly.
- Insert New Cartridge and Close Cover: Slide the new toner into the slot and close the front cover securely.
Changing Toner for Sharp Photocopiers
- Press the “Toner” Button: After the copier has warmed up, press the “Toner” button to access the toner compartment.
- Lift the Toner Compartment Cover: This will allow you access to the cartridge area.
- Take Out the Empty Cartridge: Grasp the old cartridge and pull it out.
- Prepare the New Cartridge: Unbox and gently shake the new toner.
- Place New Cartridge and Snap Cover Shut: Install the new toner and snap the compartment cover back into place.
Changing Toner for Fuji Xerox Photocopiers
- Open the Front Door: Identify and open the front door of the copier for accessing the toner compartment.
- Identify the Cartridge to Replace: Locate the specific cartridge that needs to be changed.
- Pull Out the Cartridge: Grab the cartridge and lift it out gently.
- Gently Rock the New Cartridge: Move the new cartridge side-to-side to evenly distribute the toner inside.
- Install It and Close the Front Door: Insert the new cartridge securely back into its slot, then close the front door.
Changing Toner for HP Photocopiers
- Open the Printer Access Door: Locate and open the access door to reach the toner area.
- Find the Toner Cartridge: Identify the cartridge that requires replacement.
- Slide Out the Old Cartridge: Pull the old cartridge straight out of the printer.
- Unbox the New Cartridge Carefully: Take the new cartridge from its packaging.
- Insert New Cartridge and Close Door: Place it into the correct slot and ensure the door is closed properly
This video below a professional guide on how to efficiently replace a toner cartridge in your photocopier
FAQs
Q1: How often should I change the photocopier toner?
A: The frequency depends on usage; usually, you should check the toner levels regularly and change it as needed, typically every few thousand pages.
Q2: What should I do if the new toner does not fit?
A: Ensure that you’ve purchased the correct toner model for your specific photocopier. Check the model number, as incompatibility can cause installation issues.
Q3: Is it safe to change toner cartridges without gloves?
A: Yes, it is generally safe, but gloves can prevent toner dust from getting on your hands and making a mess.
Q4: Can I recycle old toner cartridges?
A: Yes, many manufacturers and certain retailers offer recycling programs for used toner cartridges, which is a great way to help the environment.
By mastering the art of changing copier toner cartridges, we contribute to smooth office operations while ensuring high-quality document production. A little knowledge can go a long way in maintaining our essential office equipment!
GQ Office Solutions: Your Go-To Source for Office Photocopier Rentals in Malaysia. Call Us Today!
DIY Guide: How to Change the Fuser in a Photocopier or Office Copier
How to Replace a Photocopier Fuser Unit – Step-by-Step Guide for Office Copiers
Are you facing a copier fuser unit issue? If your office photocopier is not producing crisp, high-quality prints, or if you notice wrinkles, smudges, or blank pages, it might be time to replace the fuser unit. The fuser is a critical component in laser printers and copiers, responsible for bonding toner onto the paper. Over time, it can wear out, leading to poor print quality.
In this article, we’ll guide you through the process of replacing the fuser unit for popular brands like Ricoh, Fujifilm, Sharp, and HP. We’ll also provide a handy table for quick reference and answer some frequently asked questions to help you troubleshoot and maintain your office copier.
Why Replace the Fuser Unit?
The fuser unit is a consumable part that eventually needs replacement. Signs that your fuser is failing include:
- Wrinkled or creased pages
- Toner not adhering to the paper properly
- Blank or partially blank pages
- Error messages indicating a fuser issue (e.g., "Fuser Error" or "Replace Fuser Unit")
Replacing the fuser unit is a relatively straightforward process, but it does require care and attention to detail.
Tools You May Need:
Before you start, gather the following tools and materials:
- A new fuser unit (compatible with your copier model)
- A screwdriver (usually Phillips or Torx, depending on the brand)
- Protective gloves (to handle hot components)
- A flat workspace
Step-by-Step Guide to Replacing the Fuser Unit
The replacement process varies slightly depending on the brand of your copier. Below, we’ve outlined the steps for Ricoh, Fujifilm, Sharp, and HP models.
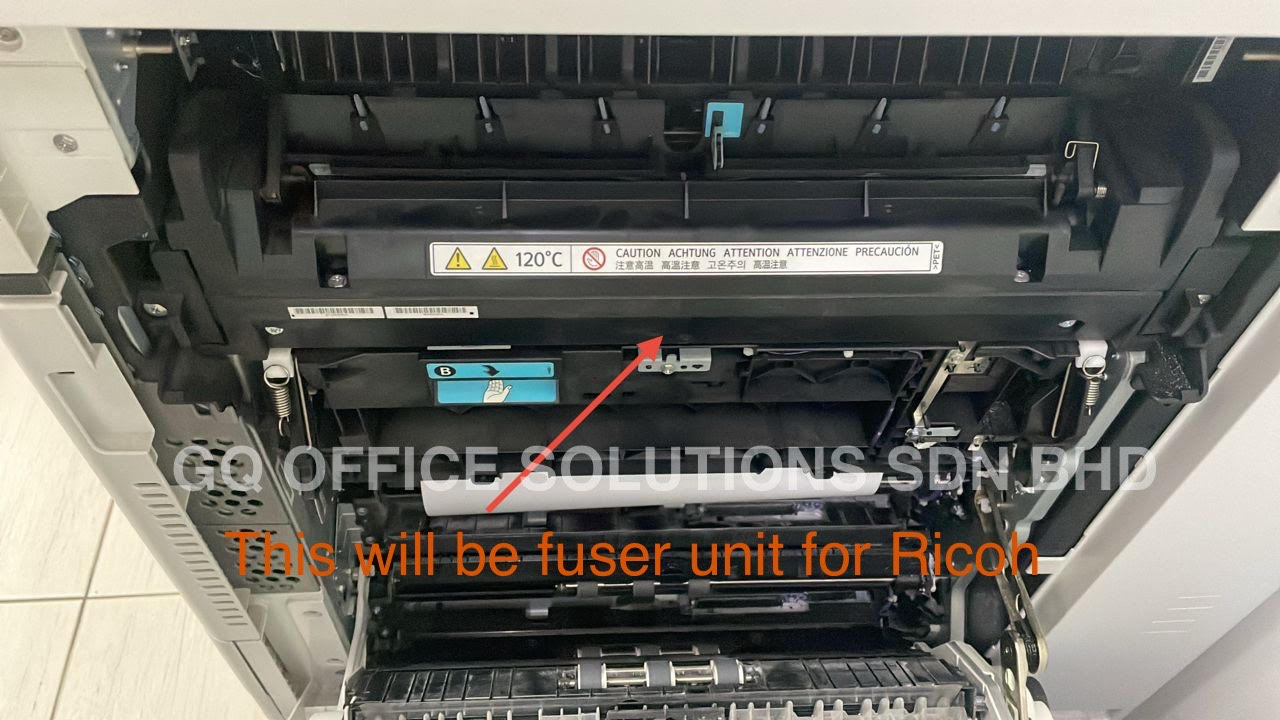
1. Ricoh Copiers
- Step 1: Turn off your Ricoh copier and unplug it from the power source.
- Step 2: Open the front or side panel to access the fuser unit. This may require removing a few screws.
- Step 3: Locate the fuser unit, which is typically held in place by clips or screws. Remove the screws or release the clips to slide it out.
- Step 4: Install the new fuser unit, ensuring it’s securely fastened.
- Step 5: Reassemble the panels and plug in the copier. Turn it on and run a test print to ensure the issue is resolved.
2. Fujifilm Copiers
- Step 1: Power down the copier and unplug it.
- Step 2: Access the fuser unit by opening the top or rear panel.
- Step 3: Disconnect any electrical connectors attached to the fuser.
- Step 4: Remove the old fuser unit and replace it with the new one, reconnecting the electrical connectors.
- Step 5: Close the panels and test the copier with a print job.
3. Sharp Copiers
- Step 1: Turn off and unplug the Sharp copier.
- Step 2: Open the front or side access panel.
- Step 3: Locate the fuser unit, which is usually near the toner cartridge.
- Step 4: Remove the old fuser by releasing the locking tabs or screws.
- Step 5: Install the new fuser and reassemble the copier.
- Step 6: Test the copier with a print job to ensure proper function.
4. HP Copiers
- Step 1: Power off and unplug the HP copier.
- Step 2: Open the top or rear access panel to locate the fuser unit.
- Step 3: Release the fuser by removing the retaining screws or clips.
- Step 4: Carefully pull out the old fuser and replace it with the new one.
- Step 5: Reassemble the panels, plug in the copier, and run a test print.
Quick Reference Table
| Brand | Access Location | Tools Needed | Key Steps |
|---|---|---|---|
| Ricoh | Front or side panel | Phillips or Torx screwdriver | Remove screws, slide out old fuser, install new |
| Fujifilm | Top or rear panel | None | Disconnect connectors, replace fuser |
| Sharp | Front or side panel | None or Phillips screwdriver | Release locking tabs, replace fuser |
| HP | Top or rear panel | Phillips screwdriver | Remove screws, replace fuser |
In the video below, a photocopier expert demonstrates a practical solution for replacing the fuser unit in a photocopier.
FAQs About Replacing the Fuser Unit
1. How much does a new fuser unit cost?
The cost of a fuser unit varies by brand and model. On average, you can expect to pay between RM1800 and RM2500 for a original replacement.
2. Can I replace the fuser unit myself, or do I need a technician?
With basic technical skills and the right tools, you can replace the fuser unit yourself. However, if you’re unsure, it’s best to contact a professional.
3. How long does it take to replace the fuser unit?
The replacement process typically takes 15 to 30 minutes, depending on the complexity of your copier model.
4. Can I repair the fuser unit instead of replacing it?
The fuser unit is a consumable item and cannot be repaired. It must be replaced when it fails.
5. How can I prevent fuser unit issues in the future?
Regular maintenance, such as cleaning the copier and ensuring proper ventilation, can help extend the life of the fuser unit.
Conclusion
Facing a copier fuser unit issue? Replacing it is a manageable task if you follow the right steps. By using this guide, you can restore your office copier to optimal performance and ensure crisp, professional prints. Remember to always use genuine replacement parts and consult your user manual for specific instructions tailored to your model.
If you’re still unsure, don’t hesitate to reach out to a certified technician. A functioning fuser unit is essential for smooth office operations, and addressing the issue promptly will save you time and frustration in the long run.
GQ OFFICE SOLUTIONS: Reliable Photocopier Rentals for Offices in Malaysia Contact Us Today!!!
How to Ensure Original Document Size When Copying on Any Brand of Copier
How to Copy Original Size Documents on Any Multi-function Photocopier (Sharp, Ricoh, Fuji Xerox & FujiFilm, HP etc.)
When it comes to office productivity, knowing how to efficiently use our multi-function photocopiers can significantly streamline our workflow. One question we often encounter is, "How do we copy original size documents?" Fortunately, multi-function photocopier machines from different brands, such as Ricoh, Sharp, Fuji Xerox, and HP, are designed to accommodate this need with ease. In this article, we will walk through the steps required to copy documents in their original size on these brands, ensuring we utilize our machines to their fullest potential.
Understanding Original Size Copying
Before diving into the steps, let's clarify what we mean by "original size". This refers to the ability of the photocopier to replicate documents at the same dimensions without scaling them up or down. This is particularly important for documents that contain fine details, charts, or images where accurate size preservation is critical.
Steps to Copy Original Size Using Various Brands
| Brand | Steps to Copy Original Size |
|---|---|
| Ricoh | 1. Place the document face up in the ADF or face down on the glass. 2. Select "Copy" on the panel. 3. Tap on "Original Size" and choose "Auto Detect" or select the specific size. 4. Make any other adjustments (e.g., number of copies). 5. Press "Start" to begin copying. |
| Sharp | 1. Open the document feeder or the flatbed glass. 2. Choose the "Copy" mode on the screen. 3. Find "Original Size" options; select "Auto" or manually input the size. 4. Confirm all settings, and press "Start". |
| Fujifilm (Fuji Xerox) | 1. Lay the document on the flatbed or feed it through the ADF. 2. Touch the "Copy" button. 3. Choose "Fit to Page" settings and ensure it's set to original or actual size. 4. Select the desired copies and press "Start." |
| HP | 1. Place the document correctly on the glass or into the ADF. 2. Navigate to the "Copy" function. 3. Choose "Original Size" from the settings, either "Auto" or specific size. 4. Adjust any relevant settings, then hit "Start." |
Detailed Breakdown of Each Brand’s Process
Ricoh: We generally find that Ricoh machines are intuitive. After selecting the "Copy" mode, the original size feature can either automatically detect the dimensions of our document or allow us to input the exact sizes manually. This flexibility makes copying a breeze.
Sharp: Among various brands, Sharp’s interface often features easy navigation. The "Original Size" setting is user-friendly; we can even input custom dimensions, which is useful for oversized documents.
Fujifilm (Fuji Xerox): In our experience with Fuji Xerox models, ensuring the correct size is vital because Scaled-down copies can diminish crucial information. Their machines generally offer clear options for both the automatic and manual selection of sizes.
HP: HP's models stand out with their smart touch panel, allowing quick access to copy settings. Their ability to recognize the input document size through the automated "Original Size" function is commendable.
Common Challenges and Solutions
Despite the simplicity, we may encounter a few challenges. Here are some handy solutions:
| Problem | Solution |
|---|---|
| The copier incorrectly scales the document | Ensure to check the "Original Size" setting. |
| Poor quality copies | Clean the glass and ensure the document is flat. |
| Document jams in ADF | Check for foreign objects and ensure the paper is correctly aligned. |
Watch the video below as a photocopier expert walks you through the step-by-step process of copying documents at 100% original size on a multifunction printer.
Frequently Asked Questions
Q: What if my document is a different size than standard paper?
A: Most photocopiers allow for custom size settings. Usually, this option is available under "Original Size."
Q: Can I copy double-sided documents without scaling issues?
A: Yes, simply select the "Double-Sided" option, and ensure that "Original Size" is correctly set for both sides before starting.
Q: What if my copier doesn't have an automatic size detection?
A: You can manually enter the dimensions if auto-detection is not available on older models.
Conclusion
Copying documents in their original size is a key feature in multi-function photocopiers. By understanding the specific steps for various brands like Ricoh, Sharp, Fuji Xerox, and HP, we can avoid common pitfalls and achieve precise results. Armed with this knowledge and our trusty photocopiers, let’s optimize our output and ensure that our documents retain their integrity and professionalism. Happy copying!
Photocopier Jam Problem? How to Clear It & Keep Your Machine Running Smoothly
Paper Jam in Copier? Here’s What to Check & How to Clear It Safely
Paper jams can be one of the most frustrating issues we encounter while using copiers in our offices. They not only disrupt our workflow but can also lead to time loss and unnecessary stress. Fortunately, with a systematic approach and understanding the specific requirements for different brands, we can effectively clear paper jams and ensure our copier systems run smoothly. In this article, we’ll explore what we need to check when a paper jam occurs and how to clear the system after removing the paper. We’ll also provide a helpful table detailing the steps to take for various popular copier brands: Ricoh, Sharp, Fujifilm, and HP.
What to Check When a Paper Jam Occurs
When we encounter a paper jam, there are several key aspects we need to investigate. Here’s what we should check:
-
Jam Location: Determine where exactly the paper jam has occurred. Common places include the paper tray, the fuser area, or the output tray.
-
Paper Type and Quality: Check if the type of paper being used is compatible with the copier. Low-quality paper or incorrect sizes can often lead to jamming.
-
Paper Tray Capacity: Ensure that the paper trays aren't overloaded. Overfilling can lead to skewed feeding and eventual jams.
-
Rollers and Feed Mechanism: Inspect the rollers for wear, dust, or debris that could hinder smooth paper feeding.
-
Settings: Verify the printer settings to ensure they match the paper type being used. Mismatches can cause feeding issues.
-
Obstructions: Look for any foreign objects lodged in the machine, which could impede the paper's movement.
Once we identify the issue, we can proceed with clearing the paper jam.
How to Clear the System After Removing the Paper
After successfully removing the jammed paper, we must ensure that any residual bits of paper or debris are cleared from the copier system. Here’s how we can do this:
-
Turn Off the Copier: For safety, always turn off the copier before performing maintenance.
-
Check the Jammed Areas Again: Double-check the areas where the jam occurred for any remaining pieces.
-
Clean the Rollers: Use a soft, lint-free cloth to wipe the rollers gently. If necessary, lightly dampen the cloth with water or a mild cleaning solution. Avoid using harsh chemicals that can damage components.
-
Reset the Copier: Once everything looks clear, turn the copier back on to reset the internal system.
-
Test Print: Perform a test print to ensure that all systems are functioning correctly.
Step-by-Step Guide for Various Brands
To help streamline this process further, we’ve compiled a table with steps for clearing paper jams for Ricoh, Sharp, Fujifilm, and HP copiers.
| Brand | Steps to Clear Paper Jam | Checkpoints After Clearing |
|---|---|---|
| Ricoh | 1. Open the front cover and remove the jammed paper. 2. Check the paper tray and fuser for extra paper bits. 3. Close the front cover and reset. | - Inspect the rollers for wear. - Check paper settings. |
| Sharp | 1. Open the bypass tray and remove the jam. 2. Remove any residual paper from the fuser area. 3. Close all trays securely. | - Ensure the paper type matches settings. - Clean rollers if necessary. |
| Fujifilm | 1. Turn off the device and open the rear cover. 2. Gently pull out the jammed paper from the access point. 3. Power on and run a diagnostic. | - Verify loading in all trays. - Test print function. |
| HP | 1. Open the printer access door. 2. Carefully remove the jammed paper. 3. Close the door securely and restart. | - Inspect for debris in the paper path. - Ensure proper paper loading. |
In the video below, a photocopier expert demonstrates a practical solution to clear paper jams
FAQs
1. What causes paper jams most frequently?
Most often, paper jams arise from using incompatible paper types, overloading paper trays, dirty rollers, or mechanical failures in the paper feed system.
2. How can we prevent paper jams?
Using recommended paper sizes and types, maintaining the copier’s hygiene, and checking settings regularly can significantly reduce the frequency of jams.
3. Is it safe to pull out jammed paper?
Yes, as long as the copier is turned off and you follow the manufacturer's guidelines, pulling out jammed paper is safe. Always refer to the user manual for specific instructions.
In conclusion, while paper jams can be inconvenient, knowing what to check and how to clear them can save us time and frustration. By following the steps outlined in this article and using the provided brand-specific guidelines, we can maintain optimal copier performance and ensure a smooth workflow in our offices.
Upgrade Your Office Efficiency – Rent a Copier from GQ OFFICE SOLUTIONS SDN BHD Contact Us Today!!!
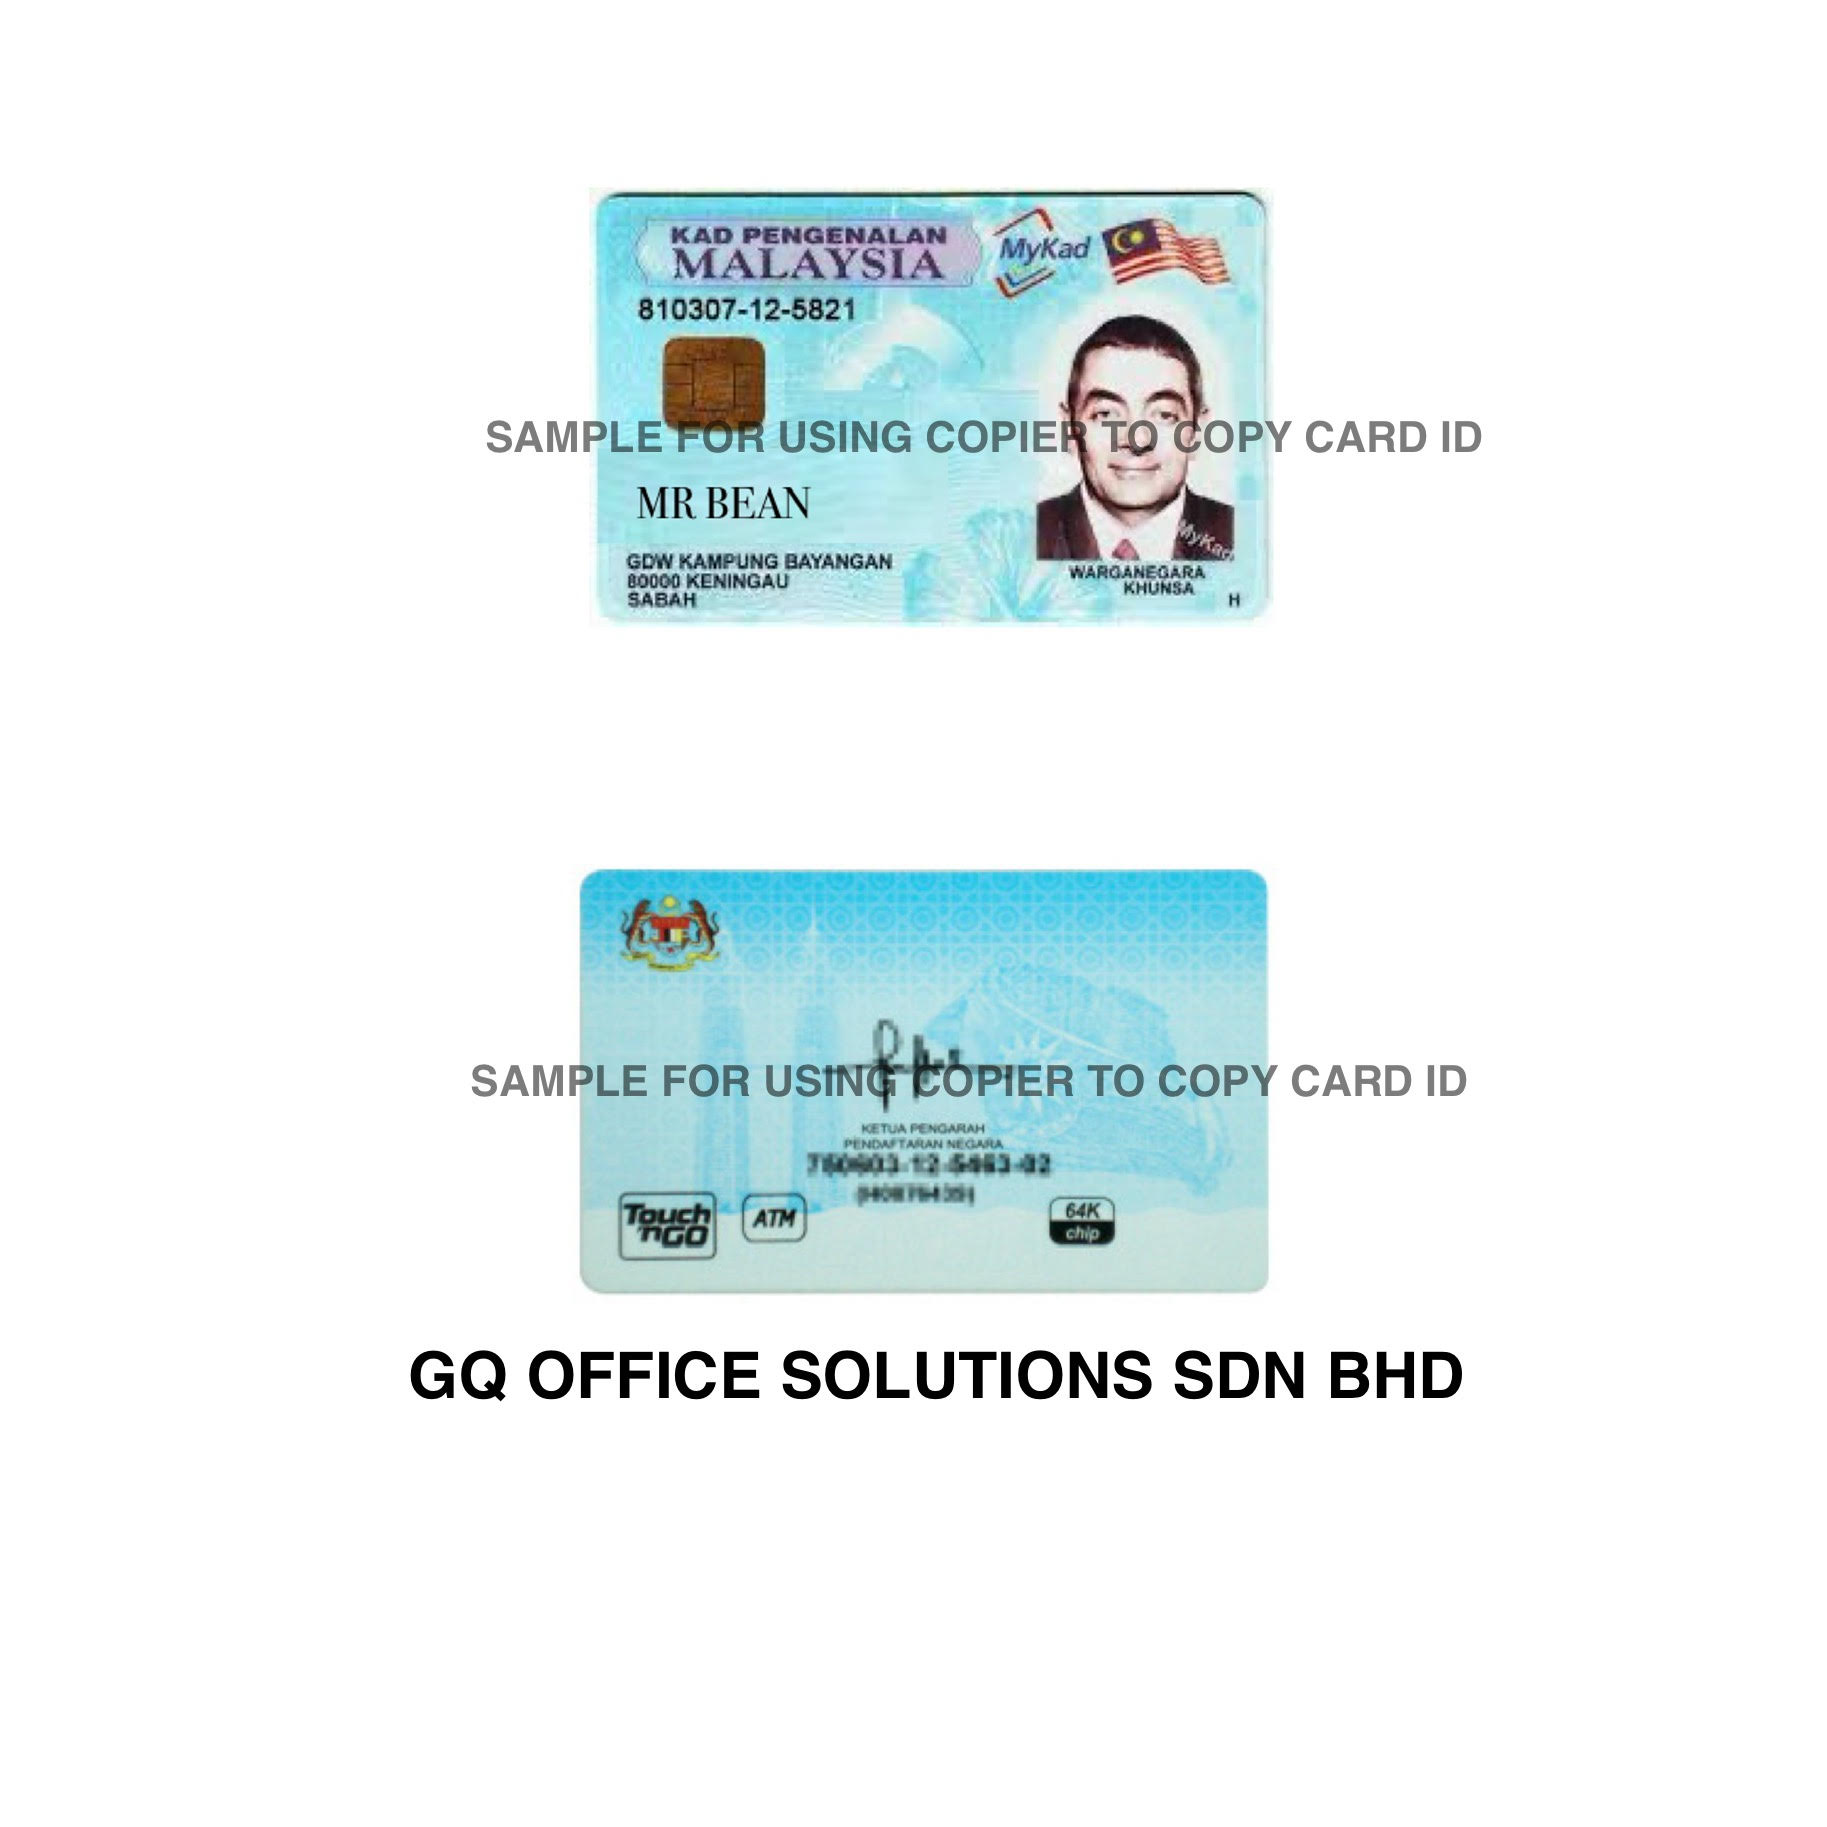
How to Copy an ID Card Using a Copier Machine – Step-by-Step Guide
How to Make Front and Back ID Card Copies on One Page – Copier Tutorial
In a world that's increasingly embracing digital solutions, we often overlook the powerful features of our trusty office copiers. While it's true that mostly all brand copier machines have the function for ID copying, many users do not fully understand this function and its potential advantages. Today, we’ll guide you step-by-step on how to create front and back ID card copies on a single page—an easy process that can save time and paper!
Understanding the ID Copy Function
The ID copy function on copier machines is specifically designed to streamline the process of duplicating identification cards, such as driver's licenses or ID cards. This function allows you to copy both the front and back of your ID on one side of a sheet of paper. Sounds simple enough, right? Yet, many users overlook or misinterpret the extensive capabilities of their copier machines.
Step-by-Step Guide to Copying Front and Back ID Cards
Let’s break down the process into easy steps. Below is a general guideline that works for most brands of multifunctional copiers.
Step 1: Prepare Your Copier
Before we start, ensure that your copier is turned on, loaded with paper, and ready to go. If you’re unsure about any settings, it’s advisable to refer to your copier’s manual for specific instructions tailored to your machine.
Step 2: Select the ID Copy Function
Once your copier is ready, locate the ID copy function. This is usually found in the main menu or as a dedicated button on many copiers. Refer to the table below for guidance based on your brand of copier:
| Brand | ID Copy Button/Function |
|---|---|
| Canon | Look for "ID Copy" on the home screen or main menu |
| Xerox | Select "ID Card Copy" from the display |
| Brother | Navigate to "Copy" and choose "ID Copy" |
| HP | Find the "ID Copy" option in the copy settings |
| Ricoh | Look under "Special Modes" for "ID Card Copy" |
Step 3: Place Your ID Card on the Glass
With the ID copy function selected, place your ID card face down on the copier glass. It's crucial to align it according to the marks usually found on the glass. Most machines will have an indicator for where to place the document. Be sure that the front side of the ID card is positioned correctly.
Step 4: Scan the Front Side
Press the "Start" button to scan the front side of your ID. The display panel may prompt you to flip the card for the next step. Follow the instructions carefully.
Step 5: Insert the Back Side
After scanning the front, lift the ID card and flip it over. Place it back on the glass, ensuring it aligns properly with the indicators. Hit "Start" again to scan the back side of the card.
Step 6: Print Your Copy
Once both sides have been scanned, your copier will usually provide an option to print out a combined copy. Select the format you prefer (usually one-sided or two-sided), and then press "Print." Congratulations! You now have a front-and-back copy of your ID card on a single page.
Tips for Optimal ID Copies
- Clean the Copier Glass: A dirty glass can affect the quality of your copy. Wipe it down with a microfiber cloth regularly.
- Adjust Settings: If your copier allows, consider adjusting brightness and contrast settings to get a clearer copy.
- Use Quality Paper: For more professional-looking copies, use high-quality paper that can withstand handling
In the video below, a photocopier expert demonstrates how to copy ID card using copier machine
FAQs about ID Copying on Copiers
Q: What if my copier does not have an ID copy function?
A: If your copier lacks this feature, you can still copy ID cards by scanning the front and back separately and manually aligning them later using a software application.
Q: Are copies made from copiers legally valid?
A: Typically, photocopies of ID cards are acceptable for various purposes, such as verifying identity. However, check with the requesting party for specific requirements.
Q: How do I know the right settings for my ID card copy?
A: Refer to your copier's manual for recommended settings tailored to ID card copying. Most copiers include pre-set functions designed for optimal ID copying.
Q: Can I reduce the size of the ID when copying?
A: Yes, many copiers allow you to adjust the copy size if you need a smaller version of the ID.
In conclusion, mastering the ID copy function on copiers can streamline processes and enhance our efficiency in handling identification documents. Hopefully, this guide encourages everyone to utilize this handy feature. So, let’s gather our ID cards, and with the help of our multifunction machine, let’s get copying!
Let's Find Your Ideal Copier Rental – Contact Us For The Best Photocopier Rental Plans!!!
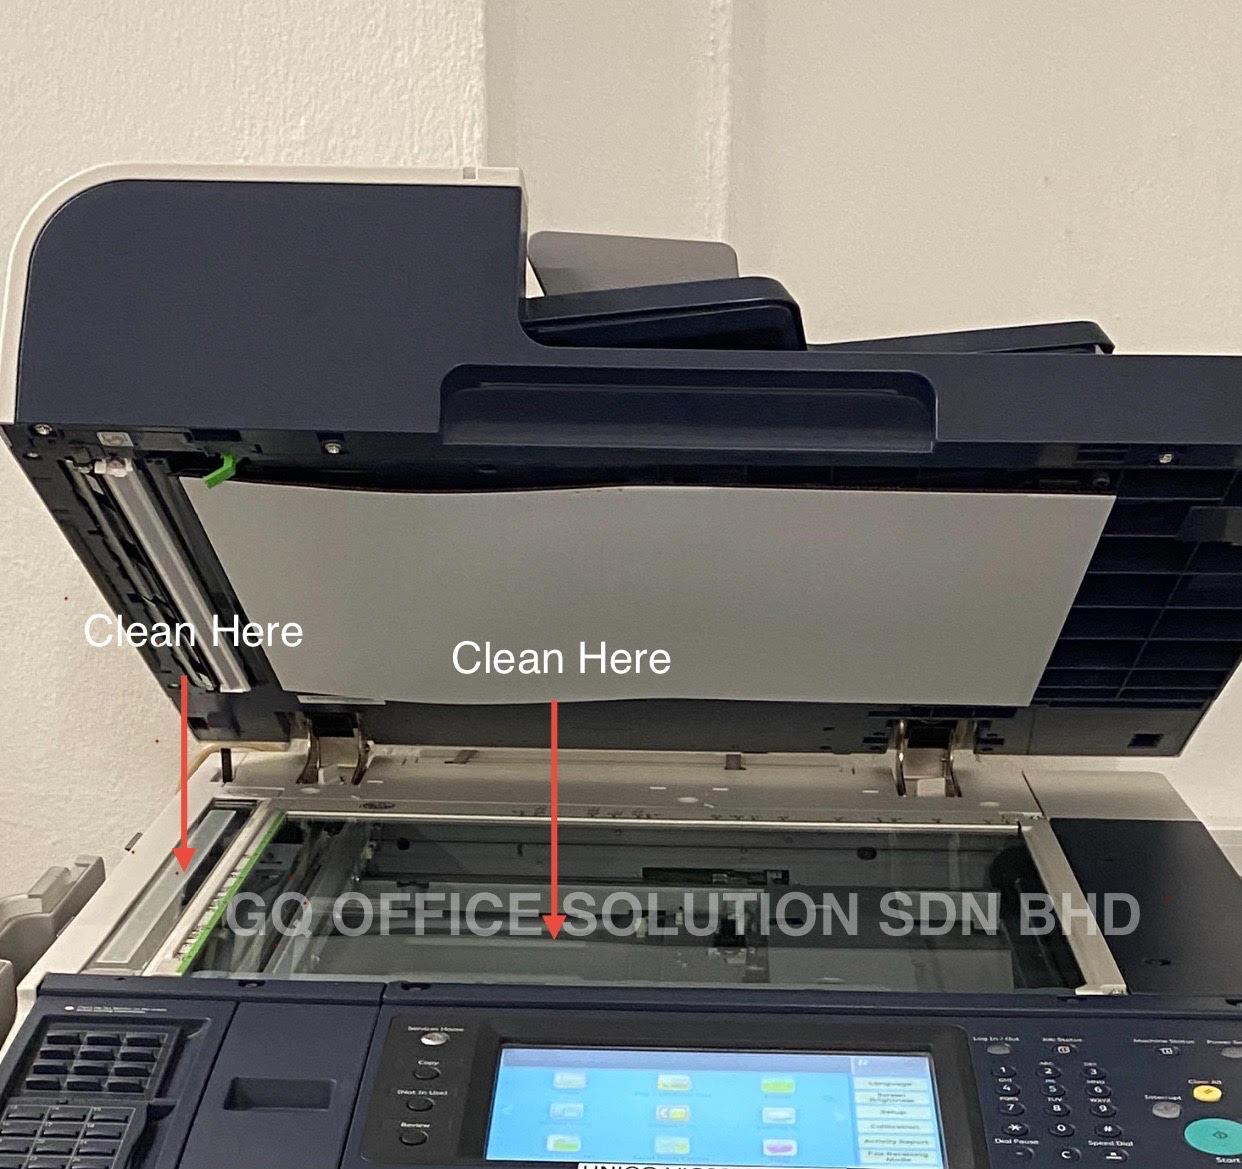
The Ultimate Guide to Cleaning Copier Glass – Fix Copy Quality Issues Fast
Improve Copy Quality Instantly – How to Clean Photocopier Glass Like a Pro
In our daily routines, a multi-function photocopier is indispensable. It helps us create documents, brochures, and various printed materials with ease. However, nothing is more frustrating than when our photocopier produces unclear text or lines on copied documents. We’ve all been there; we place our carefully crafted document on the photocopier, press "start," and the outcome is nothing short of disappointing. There is nothing like seeing a faded line or unclear text on a vital document to ruin our day.
Why is Cleanliness Key?
At first glance, the cause of blurred or unclear text may seem straightforward. Often, the culprit is dirty glass on the photocopier. Paper dust, fingerprints, and smudges can accumulate over time, affecting the quality of our copies. It's essential that we regularly clean the photocopier glass to ensure high-quality output.
Cleaning the photocopier glass can be accomplished in just a few simple steps, and today, we’ll share our method with you.
Step-by-Step Guide to Cleaning Photocopier Glass
| Step | Action | Notes |
|---|---|---|
| 1 | Turn Off the Photocopier | Always prioritize safety before cleaning. |
| 2 | Gather Cleaning Supplies | Use a microfiber cloth and a gentle glass cleaner (or isopropyl alcohol). |
| 3 | Wipe the Glass (top and bottom) | Use a circular motion to eliminate smudges. |
| 4 | Check for Streaks | Inspect the glass for any remaining marks. |
| 5 | Clean the surrounding areas | Don’t forget the path where the paper travels; dust can accumulate here too. |
| 6 | Turn the Machine Back On | Allow it a moment to prepare before testing it out. |
Common Issues
Even after cleaning the photocopier glass, we may still encounter issues such as unclear text or lines on copied documents. If this is the case, it might be time to consider other factors that can affect copy quality:
- The Condition of the Drum Unit: If the drum is worn or damaged, it won't effectively transfer toner onto the paper.
- Quality of Toner: Inferior toner can produce poor-quality copies. Invest in high-quality supplies for best results.
- Misalignment: Sometimes, the paper or the toner cartridge can become misaligned, causing unclear copies.
- Internal Components: There might be dust or debris in the internal mechanisms of the copier that requires professional services.
When to Seek Professional Help
In situations where cleaning the photocopier glass does not solve the issue of unclear text or lines on copied documents, it is essential to consult with a copier expert supplier. A professional can diagnose and rectify more severe underlying issues within the machine. They have the experience and tools necessary to restore your photocopier to its optimal condition.
In the video below, a photocopier expert demonstrates a practical solution to clean the copier scanner glass
FAQs about Photocopier Maintenance
Q1: How often should I clean the photocopier glass?
A: We recommend cleaning the glass at least once a week, or more frequently in high-usage settings.
Q2: Can using paper towels damage the glass?
A: Yes, paper towels can scratch the glass surface. It's best to use a microfiber cloth.
Q3: What if I notice colors bleeding in my copies?
A: This could indicate a problem with the toner cartridges or the imaging drum. It's advisable to consult a professional.
Q4: How can I prolong the life of my photocopier?
A: Regular cleaning, using high-quality supplies, and scheduling periodic professional maintenance can significantly prolong its lifespan.
Conclusion
In conclusion, maintaining the cleanliness of our multi-function photocopier is crucial for ensuring high-quality outputs. By following our step-by-step guide to cleaning the photocopier glass, we can instantly improve the quality of our documents. However, if issues persist despite our efforts, seeking professional help is imperative. Investing in a qualified copier expert supplier can save us time, money, and frustration in the long run, ensuring our photocopier operates at its best for years to come.
Happy Copying!
We hope this article has equipped you with the knowledge to tackle your photocopier woes like a pro. Remember, a clean photocopier glass can make all the difference, but when in doubt, don’t hesitate to call in the experts. Your documents deserve the best!
Let's Find Your Ideal Copier Rental – Contact Us For The Best Photocopier Rental Plans!!!
Troubleshooting Photocopier Machine Streaks & Faded Printing: Expert Tips for Clear Prints
Solve Printing Problems: How to Fix Streaks, Lines, and Faded Text
We've all been there. You're about to print an important document, and instead of a crisp, clean output, you get a page marred by streaks, unsightly lines, or frustratingly faded text. Before you resign yourself to calling a technician, let's explore some troubleshooting steps you can take to resolve these common copier and printer issues. Often, the solution is simpler than you think!
Identifying the Culprit:
The first step is understanding why these problems are occurring. Streaks, lines, and faded text can stem from a few key sources:
- Low Toner/Ink: This is the most common and straightforward cause. If your toner or ink is running low, the printer may not be able to distribute the necessary pigment evenly.
- Dirty Printhead or Laser Unit: Dust, debris, and dried ink/toner can accumulate on the printhead (in inkjet printers) or the laser unit (in laser printers), obstructing the printing process.
- Paper Issues: The type of paper you're using might not be compatible with your printer, leading to poor ink absorption or toner adhesion.
- Drum Unit Problems (Laser Printers): The drum unit is responsible for transferring the toner onto the paper. If it's damaged or nearing the end of its lifespan, it can cause printing defects.
- Fuser Issues (Laser Printers): The fuser melts the toner onto the paper. If it's malfunctioning, the toner may not adhere properly, resulting in smudging or fading.
Troubleshooting Steps:
Now that we know the potential causes, let's dive into the solutions:
- Check Toner/Ink Levels: The most obvious, but often overlooked. Replace empty cartridges immediately. Even if the printer indicates "low toner," it could be affecting print quality.
- Clean the Printhead (Inkjet Printers): Most inkjet printers have a built-in cleaning function. Access this through your printer's control panel or software. Run the cleaning cycle a few times.
- Clean the Laser Unit (Laser Printers): This requires a little more care. Power off and unplug your printer. Open the printer and locate the laser unit. Use a specialized laser printhead cleaning brush designed for this purpose. Gently brush away any dust or debris. Avoid touching any internal components with your fingers.
- Inspect and Replace the Drum Unit (Laser Printers): Check the drum unit for any visible damage. If it's near its end-of-life, replace it with a new one.
- Check Paper Type and Quality: Ensure you're using the correct type of paper for your printer (e.g., plain paper, glossy paper). Make sure the paper is not damp or damaged.
- Run a Test Print: After each troubleshooting step, run a test print to see if the issue is resolved.
- Restart Your Printer and Computer: Sometimes, a simple restart can clear temporary glitches that may be affecting print quality.
- Update Printer Drivers: Outdated or corrupted printer drivers can cause various issues. Visit the manufacturer's website to download and install the latest drivers for your printer model.
When to Seek Professional Help
While many printing problems can be resolved with these steps, some issues require professional attention. It's time to call in the Copier experts if:
- You've tried all the troubleshooting steps and the problem persists.
- You suspect a hardware malfunction (e.g., fuser problems, laser unit failure).
- You're uncomfortable disassembling or cleaning internal printer components.
Prevention is Key
To minimize printing problems in the future, consider these preventative measures:
- Use High-Quality Toner/Ink: Cheaper alternatives may not deliver optimal print quality and could damage your printer.
- Clean Your Printer Regularly: Follow the manufacturer's recommended cleaning schedule to prevent dust and debris buildup.
- Store Paper Properly: Keep paper in a cool, dry place to prevent moisture damage.
- Use the Correct Paper Type: Always use the paper type recommended for your printer.
In the video below, a photocopier expert demonstrates a practical solution to fix common printing issues such as streaks and faded text. We hope it helps you get your prints back to perfection!
FAQs
Q: Where can I buy a laser printhead cleaning brush?
A: You can find laser printhead cleaning brushes at most office supply stores or online retailers that sell printer supplies. Make sure to choose one specifically designed for laser printers.
Q: How often should I clean my printer?
A: The frequency of cleaning depends on your printing volume and environment. In general, cleaning every few months is a good practice. Refer to your printer's manual for specific recommendations.
Q: Can I use compressed air to clean the laser unit?
A: While compressed air can be used, use it cautiously and from a distance. Avoid using it directly on sensitive components, as it can potentially cause damage. A laser printhead cleaning brush is generally a safer option.
By following these tips, we hope you can resolve common printing problems and keep your copier or printer running smoothly. However, if you find yourself facing persistent or complex issues, don't hesitate to find your professional copier solution team to solve your problem. We're here to help you get back to printing perfect documents!
Let's Find Your Ideal Copier Rental – Contact Us For The Best Photocopier Rental Plans!!!